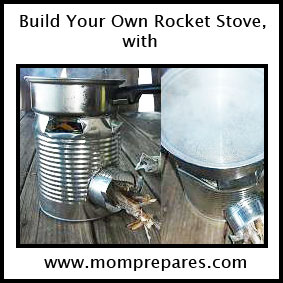
The first time I heard about a rocket stove was when my husband was researching ways to create a heat source for his workshop. My first question – what’s a rocket stove? Well, a rocket stove is basically a high-temperature combustion chamber with a vertical chimney. It requires very little fuel (generally wood) to create heat.
Not only can these efficient little heaters be used to warm an entire room, but smaller versions are an excellent way to cook food without needing lots of space or tons of fuel. Making a rocket stove also doesn’t take a lot of fancy tools and you can make onefor almost no cost at all. The project does take around an hour and a half to complete, but it is well worth it!
Building a Rocket Stove: Supplies Needed:
If you don’t have some of the following tools, ask a friend; this is a great ‘buddy’ project!
- Tin Snips
- Hammer
- Nail
- Pliers
- Wire Nippers
- Gloves
- Safety Glasses
- Permanent Marker
- 1 No. 10 Can (those big ones restaurants get fruit and such in; get the top too!)
- 4 Regular metal Cans (the ones veggies and fruit tend to come in; 15 oz)
- Material for Insulation – Perlite, sand, vermiculite, dirt, or foam (whatever you have)
- Newspaper
- Kindling
*Note: Remove all labels from each can and make sure they are clean inside. And don’t forget to wear glove and safety glasses when cutting the cans.
Building a Rocket Stove: Step One
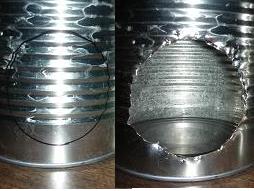
Using one of the small cans as a guideline, trace a circle on the side of the large can. Make the circle about an inch above the bottom of the can – it’ll be easier to cut this little circle out if you aren’t also trying to cut through the bottom seam on the large can.
Punch a hole in the center of the newly-drawn circle using the nail and hammer. This will give the tin snips a starting point, just like when you’re cutting a circle out of paper. It’s much easier to poke a hole in the middle of the circle and then work your way towards the outside to cut the entire circle out. Cut on the outside of the circle you drew, to give you a bit more room when the time comes to insert one of the small cans into the hole you’re cutting. If you need to widen it a bit, you can use the pliers to crimp the edges of the hole or trim it a little with the wire cutters.
Building a Rocket Stove: Step Two

Draw a circle on one of the small cans (can #1) that matches the one in the large can and cut it out. You’re going to put this small can inside the larger one – another small can will fit snuggly through both circles. To make sure the circles are the correct height, insert can #1 into the large can and trace the circle you’ve already cut in the larger can onto can #1.
Test the size of the newly-cut hole by inserting the top of a small can into it. If it doesn’t fit, cut the hole a bit larger, just as you did on the big can. Getting the right size on the smaller can is a tedious process, so be prepared to spend some time snipping!
Building a Rocket Stove: Step Three
Cut the bottom off of one of the small cans (can #2) that haven’t been used yet. You can either use a can opener or the tin snips, depending on if the bottom of the can is flat or rounded. You won’t need this bottom piece of the can, so you can discard it.
Set can #1 inside the large can and line up the hole on the smaller can with the one on the large can.
Insert can #2 into both holes. If you had to use the tin snips to get the bottom off of the can, then be sure to put the rough edge in first. This will prevent you from cutting yourself on the edge when feeding wood into the stove later.
Building a Rocket Stove Chimney: Step Four:

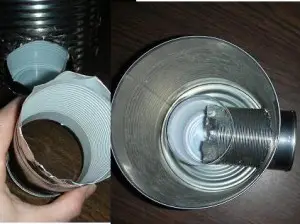
Take another small can (can #3) and cut the bottom off of it, as well as slitting it vertically from top to bottom. This is going to be the chimney on the stove.
Discard the bottom and put the slit can inside can #1 that is standing up within the large can. If you can’t get it to fit snugly inside can #1, then use the tin snips to cut the thicker edge off of the bottom of the can (if you used a can opener to take off the bottom). This should make it easier for can #3 to fit down inside of can #1. The chimney should also be lower than the top of the large can. If it sticks up past the top of the can, then you’ll need to measure and trim the bottom of can #1 until it is about a quarter inch below the top of the large can. Don’t worry if it doesn’t sit straight. The next step will hold it in place.
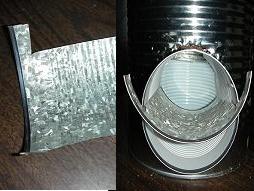
Insulating Your Rocket Stove: Step Five
Trace a circle onto the lid of the large can using small can #3 for a pattern. Be sure the circle is in the center of the lid and then cut it out. Now, just make sure the chimney (can #3) fits through this newly cut hole.
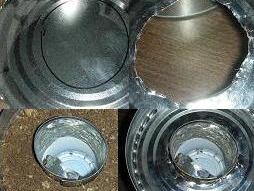
Fill the inside of the stove with your insulating material; just around the small cans inside and not in them.
Tap the can lightly on the table or other hard surface to help the contents settle better. The filler should come to about an inch below the top of the chimney (can #3). Set the lid down over the chimney and push it down until it is resting on top of the filler/insulating material.
Sticking the Rocket Stove Together: Step Six

Cut an even number of slits around the top of the large can. You will be folding down every other one (using pliers) and leaving the others to serve as a place to set your cooking pan. I cut 8 slits, which allowed me to fold down 4 wide metal flaps to secure the lids and leave 4 sticking up. Don’t make too many small flaps because they may be too flimsy and bend under the weight of the cooking pan. Also, I had to switch to a pair of gloves with thicker padding in the palms when cutting the slits – I had to use both hands to squeeze the nippers, due to the thick band around the top of the can.
Building a Rocket Stove Fuel Shelf: Step Seven
Make a fuel shelf out of the final small can (can #4). Cut a ‘T’ shape out of the can with the lower portion of the ‘T’ being slightly wider than the inside of can #1 and the upper portion being a half inch wider on each side. This allows the lower portion to fit directly into can #1, while the top part prevents it from slipping all the way inside.
The fuel shelf shouldn’t reach the far side of can #1, because there needs to be enough room to allow air to flow under and the ‘T’ shaped piece of tin and up to the wood resting on top of it.
This little shelf needs to enable air to flow under the wood stored on it and up into the chimney. Since all your small cans should be the same size, the ‘T’ shouldn’t reach the far side of can #1. If it does, then snip off about a quarter of an inch. If this is confusing, refer to the pictures and it should make a lot more sense.
Ready, Set, Cook!

Now you are ready to fire up your stove and cook a little something to eat. Or, just heat up some water and have a nice hot cup of cocoa. Here’s how you get it started:
Crumple up some small pieces of newspaper and stuff them down the chimney with a few little sticks. The chimney needs to be hot before you start feeding wood into the bottom of the stove via the fuel shelf (can #4).
After you have a nice little fire going in the chimney portion of the stove, then you can start feeding small sticks through the fuel shelf to keep it going. This is the point when you can place your pan on top of the stove.
Rocket Stoves: Fun to Make and Fuel Efficient!
These little stoves are so fuel efficient that they are used in areas of the world where fuel is scarce; kindling included. They require less than half the amount of a larger wood-burning stove and give off a lot less smoke. I hope you enjoy making one of these for your cooking needs, whether it gets used at home or on your next camping trip.
More Rocket Stove Resources
Are you going to try to make a rocket stove?
I hardly leave comments, however i did some searching and wound up here Building a Rocket Stove:
Step By Step Tutorial. Awesome!
I’m so glad you got a chance to make the stove, that’s excellent!!! Mom Prepares is my main place for writing and I don’t keep up with my Facebook page, since I can’t access Facebook easily. I do hope you enjoy my other posts on Mom Prepares, as well as all the other fabulous writers’ posts on here. It’s an excellent site for just about anything you need!
looks great
I’m no longer positive where you are getting your information, but good topic. I must spend a while studying much more or working out more. Thank you for fantastic information I used to be searching for this info for my mission.
Other models of Rocket Stoves I have seen have a wider gap between the bottom of the infeed fuel shelf & the bottom of the infeed fuel can. Should that be considered or is it enough space already as shown in your picture?
I found that the amount of space I alloted in this particular stove worked well, but you can always add a bit more!