I dug into my prepper pantry the other day and found a couple of old bags of beans that were long past their use-by date. Seeing the beans reminded me of when my son was little and needed something crafty to do to keep him occupied, so I decided to do something a little useful with the beans. Candle holders are not only fun to make, but also very functional. You can use them in an emergency, or for decoration during the upcoming holidays. There is a bit of drying-time involved, but the candle holders are otherwise fun and easy to put together. Tweak following instructions to fit whatever type of beans or containers you have on-hand.
Suggested Supplies:
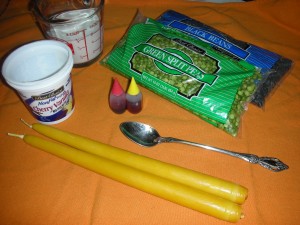
The following items are suggestions based on what I had in the pantry. Feel free to try others as well!
- Small Mixing Bowl
- Metal Spoon
- ¾ C White Glue (school glue usually dries clear, but any kind of crafting glue will do)
- Red & Yellow Food Coloring
- 1 ⅔ Cups Dried Black Beans or Split Peas
- Clean Empty Yogurt Containers (6 oz size works best)
- 2 Tea Light Candles or 2 Tapers
Candle-Holder Craft: Mixing the Ingredients
Pour the glue into the small mixing bowl. I like to use a glass bowl, so I don’t have to worry about staining my plastic bowls with the food dye used in this little project. I chose to dye the glue orange for my candle holders, but you can use any color you wish. 6 drops of red food coloring mixed with 11 drops of yellow seemed to create a nice shade of orange to go with my black beans and green split peas – make sure that you stir the dye into the glue thoroughly before adding the beans.
Add the beans to the mixing bowl and stir it until all the beans are thoroughly covered with glue. You can use just one type of bean, or mix two or three together. If you have some glitter on hand, you can even throw that in as well. Be daring!

Image by Aprille Ross
Making the Candle Holders:
Place a couple of spoonfuls of the mix into each yogurt cup. Tap the cup on the counter to help the gluey beans pack together better, and then add another spoonful on top. Be sure to tap the yogurt cup forcefully, because the mixture can be rather thick and stubborn. The ‘tap’ might actually be better if it is more of a ‘slam.’ Don’t worry – they’re dried beans, you can’t hurt ’em! Leave a little bit of room at the top of each cup, since the candle will push the bean mixture upward even further when it is jammed down into the bean and glue mix.
Shove a taper candle into the mixture – it’ll go in relatively easily. However, if you’re using a tea light, leave a ¼ inch between the top and where the gluey bean mix stops. Place the tea light on top of the packed beans and gently spoon small amounts of the mixture around the tea light. Be careful to only pack the beans around the candle, so they are level with the top of the metal portion of the tea light, and not touching the actual candle.
These crafty candle holders will take about 12 hours to dry completely. Once the glue is dry, peel the yogurt containers off and you will have a free-standing candleholder crafted from dried beans. I use a pair of sharp kitchen scissors to snip the yogurt container in various places to make the peeling process a bit easier. After you’ve peeled away the container, you might find the very bottom of the candle holder is still a bit tacky. If that happens, just place the candle holders on its side for a few hours and the glue will finish drying.

What do you do with your expired beans or peas?
This is a neat craft. It is eben better with coffee beans.
Thanks!
Do you have bees or use beeswax? I’m looking for easy beeswax candle crafts.
Thanks!!!